


Table of Contents
Whether you are a student or a working person, a Screenshot of your computer’s screen is something you may need at any time. It can be helpful when you really need to send an important piece of visual information to your boss quickly, or a funny meme that you caught on your laptop and want to share with your friend. The reason could be many but the solution is only one take a screenshot and share. What if you are new to Mac and don’t know how to take a screenshot on mac? Don’t worry will be discussing 3 simple ways to take a screenshot on a mac system in this article.
Ways to take screenshot on Mac
1. Using Default Full Screen Shortcut – Command + Shift + 3
It is the default shortcut to capture the entire screen screenshot on Mac. Just click on Command + Shift + 3 keys on your mac keyboard altogether and you are done. The system will take a screenshot of the entire visible screen and save it desktop.
It will also show a mini preview while capturing the screenshot, On tapping the mini preview you can easily see the captured image.
2. Using Default Selection Shortcut – Command + Shift + 4
Just like the first option, this is also a default shortcut for capturing the screenshot. The only difference between this option and the first option is that the first option captures the entire screen in the screenshot while this option lets you select the capture area before capturing the screen. Click on Command + Shift + 4 key on your keyboard altogether and it turns your mouse cursor into something like this (Refer below image).

Once the cursor turns into a gunshot target-like shape, Drag the cursor forming the area of selection (Refer below image).

On leaving the cursor, the formed area will be considered as the area of the screenshot and the screenshot will be captured and saved on the desktop.
3. Using the latest Screenshot tool – Command + Shift + 5
Apple introduced a new screenshot tool for all screenshot purposes. You just need to click Command + Shift + 5 keys on the keyboard and it will open the screenshot tool which looks something like this (Refer to the below image).

This Screenshot tool not only allows capturing screenshots but also allows recording the screen. So you can capture fullscreen, selected area for screenshots as well as a fullscreen and selected area for video recording. Not only this, but it also has several options and settings that you can adjust based on your preferences. Isn’t this a cool screenshot tool?
Manage Keyboard Screenshot Shortcuts
Bored with the default screenshot settings? Want to change the settings or keys for screenshot type? Don’t worry it’s possible. You can change the default keyboard shortcuts for capturing screenshots. Just click on System Preferences – then go to Keyboard Menu – Click the Shortcut tab inside Keyboard Menu.
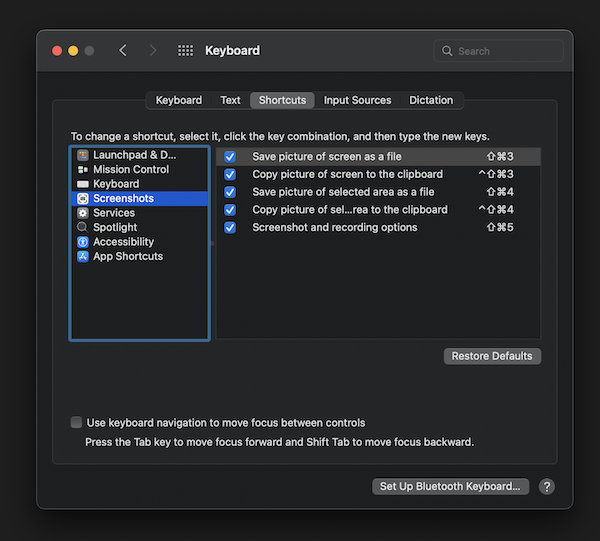
By tapping on each screenshot option you can edit the keyboard keys and you can also manage to enable and disabling of screenshot types if you wish to make changes in any default settings.
Did you enjoy reading the article? Do checkout why Apple removed glowing logo from Macbook